How to install travertine tile is a common question for DIY enthusiasts. This is because travertine is one of the most popular natural stones among homeowners and project managers. DIYers want to know how they can install the travertine tile. However, having the right guidance is relatively easy to do. In this blog post, we will provide you with step-by-step information about how to install Travertine Tile. This will ensure a smooth, professional finish after installation.

Tools Required for Installing Travertine Tile
Proper tools are a must for how to install travertine tile project. These tools have different purposes during the project:
Measuring & Layout Tools
- Tape Measure
- Chalk Line
- Carpenter’s Square
- Level
Cutting Tools
- Wet Tile Saw
- Angle Grinder (with diamond blade)
- Tile Nippers
Surface Preparation Tools
- Notched Trowel
- Margin Trowel
- Rubber Mallet
- Sponge
Mortar & Grouting Tools
- Tile Spacers
- Bucket & Mixing Paddle
- Grout Float
- Grout Sponge
Sealing & Finishing Tools
- Sealer Applicator Pad or Brush
- Soft Cloth or Buffing Pad
- Vacuum or Broom
Step By Step Guide on How to install travertine Tile?
Here is a simple yet complete guide to travertine tile installation. Keep reading for a better idea.
Preparing the Floor and Surface
Step 1 of How to Install Travertine Tile:
Before starting the travertine tile installation, preparing the surface is key. Whether they are wall tiles or floor tiles, having a smooth and clean surface will ensure that they will stick to the surface. To prepare the surface, you should:
-
Cleaning the surface
Clean the surface by removing any dust and debris. Remove any existing old tiles and flooring as well. You can use a vacuum or sweep to make sure the surface is completely clean. If installing it on the subfloor, then make sure it is leveled and dry.
-
Level the surface
A smooth and leveled surface will result in a more even tile layout. So, look for any dips or high points on the floor. If the surface is not level then use a level compound to smooth out the surface. It’ll keep the travertine tiles from cracking or shifting.
-
Waterproofing (if necessary)
If you are installing in an area that is prone to moisture, such as kitchens and bathrooms, then waterproofing is essential. Applying a layer of waterproofing will be helpful here. Travertine is a naturally porous material, so it can absorb water. This step will ensure long-lasting durability.
Measure and plan
Measure the area where you’re installing tiles with a tape measure. Before you cut your travertine tiles, lay them out to determine the best fit.
Setting Wall Tiles
Step 2 of How to Install Travertine Tile:
If you are dealing with the vertical surface, then travertine tile installation for the wall tile will be a little different. It will require more precision and care than floor tiles. Wall tiles must be well-secured to prevent any risk of falling or cracking.
-
Mark your starting point
Usually, it starts from the bottom and you take it to the upper level. Make sure the tiles are laid straight with a level tool. Mark the height of your first row with a pencil or chalk.
-
Apply the adhesive
Apply a layer of thin-set mortar or a tile adhesive that is exclusively designed for heavy stone with a notched trowel. Evenly spread it on the wall in small sections. Make sure it doesn’t dry before you have time to set the tiles.
-
Set the tiles
Make sure each tile is evenly spaced from the other by gently pressing it into the adhesive. Make sure the tiles are straight with a level. If you have a big wall, work in small sections. This is one of the common travertine tile installation mistakes where one will not focus on the straight and even level. Later on, they will notice uneven tile lippage.

-
Cutting tiles for edges
To fit the tiles for the edges, you will need to cut them. You can use a wet saw with a diamond blade because of the density of travertine tile that requires precision cutting.
-
Allow the adhesive to dry
Once you have set the tiles, leave them to dry for at least 24 hours. This will ensure that the tiles are bonded well to the wall and are ready for grouting.
Installing Travertine Floor Tiles
Step 3 of How to Install Travertine Tile:
Travertine tile installation for the floor requires patience and precision. You cannot do it in a rush or else may have to face an uneven and ugly floor tile layout. Floors in general have to face heavy traffic so it is important to ensure that each tile is properly placed and leveled.
-
Plan your layout
Start the travertine tile installation by dry-fitting your tiles. You should start from the center of the room and work your way out. This will assure you that you are going to create a balanced look. This will also assure you that there won’t be any slivers of tiles at the edges. Guide your layout by using chalk.
-
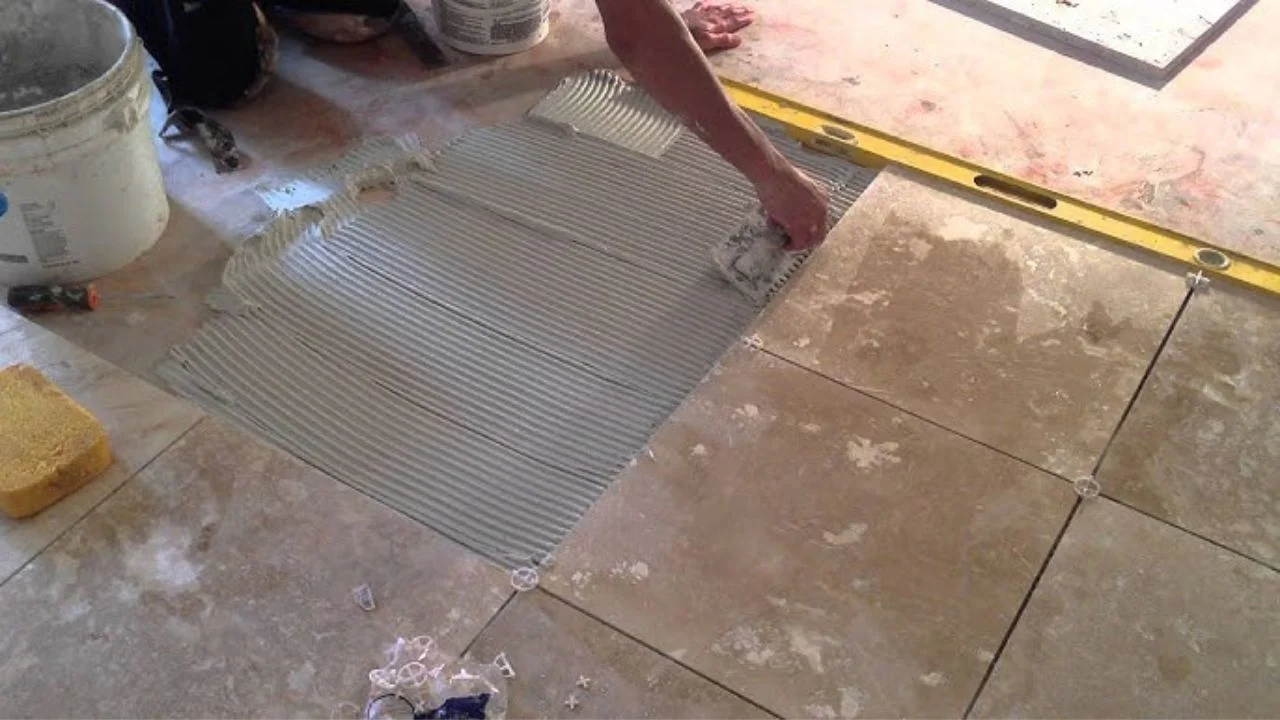
Apply the adhesive
Adhesive is an essential element of tiling, be it travertine floor tiles or wall tiles installation. A good adhesive for floor tile will assure you that the tiles stick to the wall. Use a notched trowel to spread thin-set mortar on the floor. Before you place the tiles, work in small sections to keep the adhesive from drying out.
-
Lay the tiles
Start to lay the tiles into the adhesive. Pressing down slightly and using spacers between each tile will help you to keep the grout lines even. Use a level after placing a few tiles to ensure even and flush tiles. If you notice an uneven tile, then lift it and remove the adhesive as needed.
-
Cutting the tiles
Cut the tiles using a wet saw to fit around the edges. Don’t forget to leave room for expansion.

-
Let the adhesive set
Once everything is set, leave the room for at least 24 hours. Let the tiles set on the adhesives. It is recommended to leave the room or area for a full day for even better bonding of tiles.
Applying Grout, Cleaning, and Finishing
Step 4 of How to Install Travertine Tile:
Once the travertine tile installation is done, the next essential step would be grouting. This will help you to secure the tiles and fill the gaps between them.
-
Mix the grout
Mix the grout with the color that complements your travertine tile color. Follow the manufacturer’s instructions to mix the grout to the correct consistency.
-
Apply the grout
Spread the grout over the floor tiles by using a rubber float. Press it into the joints between each tile. Start with the small sections and remove the excess grout from the tile surfaces as you go.
-
Wipe the tiles
After the grout sets, wipe away any excess grout from the tile surface with a damp sponge. Don’t pull the grout out of the joints.
-
Seal the tiles and grout
Sealing travertine tile will protect it from stains, moisture, and wear. When the grout is fully cured (usually 48-72 hours), apply a Hidro SST Natural Stone Sealer. You can also seal the grout so it doesn’t crack and get dirty.

-
Final cleaning
Use a non-abrasive Deep Degreaser Cleaner to clean the entire surface when the sealant is dried. When the cleaner is set, use a soft cloth to clean the grout lines.
Other Helpful Tips On How to Install Travertine Tile
While looking for how to install travertine tile, these bonus tips will also be helpful for a better experience.
-
Tile Thickness
Consider the thickness of the travertine tiles. The thicker tiles are considered more durable for busy areas. Thinner tiles are more suited to the wall.
-
Natural Variation
Travertine is a natural stone so it is possible to see slight variations of colour and texture. Make sure you mix tiles from different boxes so your project looks consistent.
-
Expansion Joints
Expansion gaps around the edges of the floor or wall will help the tile to move. This helps prevent the tiles from cracking over time.
-
Maintenance
Regular travertine tile maintenance is crucial after the travertine tile installation. Cleaning travertine tiles regularly with a pH-neutral cleaner. Reseal them every 1-2 years, especially in high-moisture areas like bathrooms.
These tips are an important part of how to install travertine tile, as you can be assured that your installed tiles will last longer and stay in place.
Final Words
Here is our simple guide on how to install travertine tile. We believe that the travertine tile installation is a simple process. All you need is the right tool and technical knowledge about the material. Take your time to understand everything before doing it yourself.
If you aren’t sure, talking to professional travertine installers will help you as well. The type of travertine installation also matters. If you have to choose between DIY vs professional travertine installation,, then DIY can be overwhelming. So, don’t hesitate to reach out to professionals like NT Pavers. Talk to them about the project. They can guide you about the most suited type of travertine pavers that will last for years.


