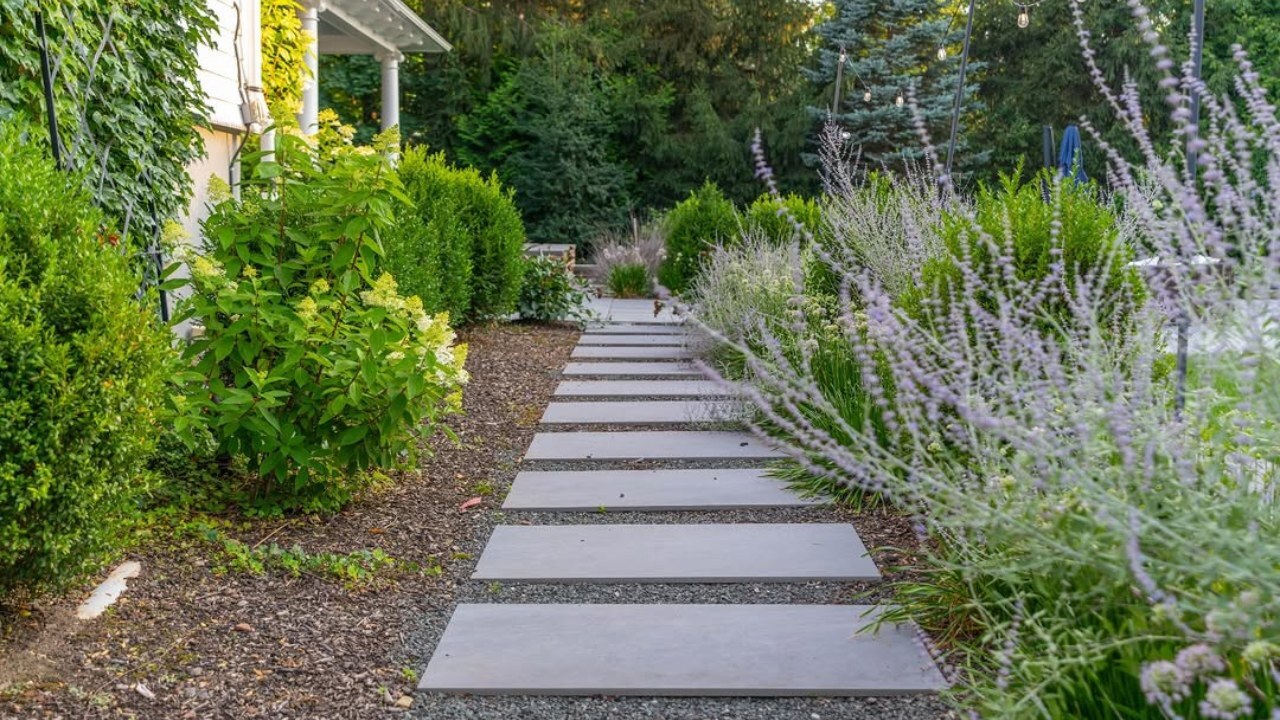
A gravel and stepping stone walkway is a beautiful addition to your outdoor space. Not only does it look aesthetic, but it also adds functionality to any space where it is installed. The best thing about a pea gravel walkway with stepping stones is that they are easy to install. This is why many homeowners prefer going DIY approach to install the walkway stepping stone. However, if you are new to creating a garden path, then don’t worry. In this post, you will learn about building a gravel and stepping stone walkway in just 7 super-easy steps, with every bit included.

Tools and Materials Required For Gravel and Stepping Stone Walkway
Tools for Gravel and Stepping Stone Walkway:
- Trowel
- Rubber mallet
- Strong string or builder’s line
- Rubber hammer or wood-handled hammer
- Line pins (for fastening string)
- Shovel or spade
- Measuring tape
- Spirit level or straight-edged timber
- Cement mixer
Materials For Gravel and Stepping Stone Walkway
- Builders sand or grit sand
- Portland cement
- Stepping stones of your choice
- Gravel
7 Super Easy Steps For Gravel and Stepping Stone Walkway
Here is the 7-step guide to installing a pea gravel walkway with stepping stones.
1- Plan the Path and Mark the Layout
Step 1 of the gravel and stepping stone walkway is planning the path. Every walkway starts with a clear route. To plan your path:
- Take a look at your yard to get an idea of where the walkway should go.
- Walk through the area to analyze where your feet naturally move.
- Gentle curves are ideal for an organic look near gardens, while straight lines are a perfect choice for contemporary homes.
- Mark the route with marking paint, a garden hose, or rope.
- Keep the walkway at least 24”- 30” inches wide for a comfortable walking surface.
- Wider paths (48” inch width) work well near patios or outdoor kitchens where people walk side by side.
Planning and marking are crucial to prevent last-minute changes later and ensure each stepping stone is placed in the right space.
2- Remove Grass and Topsoil
Step 2 of the gravel and stepping stone walkway is to clear the selected surface.
- Clear the walkway surface by removing 2-3 inches of grass and soil.
- Use a flat shovel to lift the soil. Keep the depth even so that each stepping stone sits on a stable surface.
- This step is crucial as a well-prepared base gives the walkway its structure, so this step matters more than most homeowners think.
- Dig a little deeper and add a compacted base layer for extra strength if your soil stays soft during winter. This is also helpful in areas with heavy foot traffic.
This will create the space for base gravel and the decorative layer. This will also prevent the walkway space from sinking and reduce weed growth.

3- Install Landscape Fabric
Step 3 of the gravel and stepping stone walkway is to install landscape fabric. It is helpful in separating the gravel from the soil. It prevents weed growth, adds stability, and improves drainage.
- Roll the fabric throughout the cleared path.
- Overlap each edge by several inches to prevent gaps.
- Pin the fabric with landscape staples every few feet.
- The fabric should stay tight and smooth because bumps under the fabric lead to uneven stones later.
This layer stays hidden, but it plays a long-term role in keeping the walkway clean. Without fabric, gravel mixes into the soil over time, causing ruts and uneven surfaces.
4- Add and Level the Base Gravel Layer
Step 4 of the gravel and stepping stone walkway is adding and leveling the base gravel layer.
- You can pour 1-2 inches of crushed stone or base gravel. Contractors typically use ¾-inch crushed stone (also called “crush and run”) as it locks in place after compaction.
- Add and shake the gravel until it sits evenly throughout the walkway surface.

A properly compacted base helps stepping stones set flat and reduces wobbling. This base gravel for the pathway improves drainage and prevents shifting. A good base also protects your walkway from damage like rain, stepping pressure, and freeze-thaw cycles.
5- Place the Stepping Stones
Step 5 of the gravel and stepping stone walkway is placing the stepping stones. The right stepping stone adds structural integrity to the walkway. You can choose from concrete pavers, porcelain stepping stones, natural stone paver slabs, or flagstone.
- Set each stone on the leveled base gravel.
- Place the stones with natural spaces so walking feels comfortable.
- Use a level to check the stone’s position. Adjust the gravel under each stone until it sits stably.
- Make sure the stones are fully set with appropriate support. If a stone wobbles today, it will wobble more later. So take your time and adjust the base.
The same step also works for a pea gravel walkway with stepping stones. Many homeowners prefer this stone path because of its softer, rounded appearance.
6- Add the Top Layer of Decorative Gravel
Step 6 of the gravel and stepping stone walkway is adding the top layer of decorative gravel. Once you have set the stones, pour decorative gravel around them. You can define the look of your walkway with this top layer.
The most common choices include:
- Pea gravel for a soft texture and warm, natural color
- River rock for a smooth look and garden-friendly feel
- Decomposed granite for a firm, compact surface
- Crushed stone for strong drainage and rustic character
- Marble chips for a clean, bright, modern look
While adding the gravel, keep shaking it until it sits level with the stepping stone edges. Do not bury the stones, as the walkway will lose its structure. Make sure the gravel will cradle each stone, but let the stone surface sit exposed. This step adds color, contrast, and texture to the landscape, especially where plants or mulch meet the walkway.
7. Compact, Edge, and Clean Up
Step 7 of the gravel and stepping stone walkway is compacting, edging, and cleaning up the space. A light compaction helps lock the gravel in place.

- Use a hand temper to press the gravel gently, making sure not to disturb the stepping stones.
- Add metal edging if you prefer crisp edges. You can also add stone borders or brick restraints. It is a crucial step as edging keeps the gravel from spreading into the yard. Edging also creates a finished look for a stepping stone walkway.
- Clean each stepping stone with a broom. Remove loose gravel from the stone tops to prevent slipping.
A well-compacted walkway lasts for years with only seasonal raking and an occasional top-up of gravel.
Design and Material Ideas for Gravel and Stepping Stone Walkway
You can try the simple gravel and stepping stone walkway ideas that will create a stunning look to your outdoors. These ideas for stepping stone paths help homeowners shape a lawn walkway that fits their landscape:
| Design Idea | How It Improves the Walkway |
| Use large stepping stones for modern homes | Large porcelain or concrete slabs create clean, architectural lines. The stones anchor the path visually, while the surrounding gravel softens the structure. |
| Use irregular flagstone for natural gardens. | Irregular flagstone adds color variation and an organic feel. It blends well with shrubs, groundcover, and native plants. |
| Try mixed gravel colors. | Blending gray, tan, or earth-tone gravel produces depth and hides dirt, improving walkway longevity and appearance. |
| Lift the walkway near the water features | Raised gravel-and-stone paths prevent water pooling and complement ponds, fountains, and wet areas because gravel drains fast. |
| Pair with low-voltage landscape lighting | Low-voltage lights highlight each stone, improve safety at night, and guide movement through the walkway. |
| Add curves when possible. | Gentle curves create a natural, flowing layout that suits gardens and soft landscapes. |
| Keep the stepping stones dominant. | A walkway looks intentional when stone surfaces lead the eye. Balanced stone-to-gravel ratio keeps the design clear and structured. |
Gravel and Stepping Stone Walkway FAQs
Let’s answer your gravel and pea gravel walkway with stepping stones
How deep should gravel be for a stepping stone walkway?
1–2 inches of base gravel and 1–2 inches of decorative gravel are ideal for most walkways. The exact depth depends on foot traffic and soil type. Softer soils benefit from a slightly deeper base.
What kind of gravel works best with stepping stones?
Pea gravel, decomposed granite, river rock, and crushed stone all work well. Pea gravel creates the smoothest look, while crushed stone offers more stability.
How far apart should stepping stones be placed?
18–24 inches. A comfortable step keeps the walkway functional and easy to navigate.
Do I need edging for a gravel and stepping stone walkway?
Edging is optional but helpful. Metal, stone, or concrete edging keeps the gravel managed and maintains the walkway shape long-term.
Does a pea gravel walkway with stepping stones last long?
Yes. When installed with landscape fabric and a compacted base, a pea gravel walkway with stepping stones lasts many years.
Can stepping stones sink over time?
Stones sink when the base layer is uneven or uncompacted. Preparing the base correctly prevents sinking and keeps the walkway stable.
Bottom Line
A gravel and stepping stone walkway provides homeowners with a reliable path that handles water, resists wear, and fits in most landscape styles. These 7 super-easy steps will help you build a gravel and stepping stone walkway. The process of creating a natural stone paver pathway is simple, so that you can create a finished look in your lawn. When built correctly, the combination of gravel and stepping stones offers a clean, natural, and long-lasting solution.
If you want a gravel path that feels both practical and beautiful, this system delivers. And as always, NT Pavers helps homeowners and contractors choose the right materials for paths that stay strong and look consistent across seasons.