Permeable pavers installation is widely growing in demand every year. Reasons such as stormwater regulations, rising municipal flood-control costs, and the EPA’s preference for permeable and green structures are driving this shift. Permeable Pavers Installation creates a surface that looks like a traditional walkway, patio or driveway. However, it allows water to move through the joints and into the soil beneath. This is why many homeowners want to know about the permeable installation process to make an informed decision. Keep reading to learn about the permeable pavers installation.
10 Steps of How to Install Permeable Pavers Installation Process
Professionals follow a clear sequence when completing this diy permeable paver installation.
Step 1: Site Evaluation
Before the Permeable Pavers Installation, the site assessment becomes crucial. Installers will review soil conditions, including natural slopes, drainage capacity, potential water-pooling zones, expected loads, and subsoil composition. They also check percolation rates before any design work begins.

A percolation is a crucial first step. It analyzes how fast water absorbs into the ground and determines whether the soil can control the water infiltration load. It shows if a deeper base, perforated underdrain pipes, or additional drainage provisions are required for paver installation. The soil test typically costs $300-$500+ (varies by region and scope), but it costs far less than correcting a failed installation later.
Understanding the soil test fee is just one part of the total paver installation cost, base depth, material type, and drainage provisions all affect the final budget.
The test should always be conducted by a qualified engineer before finalizing the design. Site conditions, traffic loads, drainage patterns, and closeness to building foundations vary too much for a single-size approach.
Step 2: Permits, Compliance, and Material Standards
Permeable pavement is categorized as green infrastructure under the Clean Water Act. Many municipalities now require it on new construction, while some jurisdictions limit the total impermeable surface a property can carry. Confirm local rainwater or stormwater requirements before specifying materials.
- For porcelain permeable pavers installation, material compliance centers on the unit itself. The standard thickness is 20mm, and units should have the appropriate freeze-thaw certification for the project climate.
- LEED-qualifying porcelain units typically feature Solar Reflectance (SR) values where lighter colors range between 60-80%.
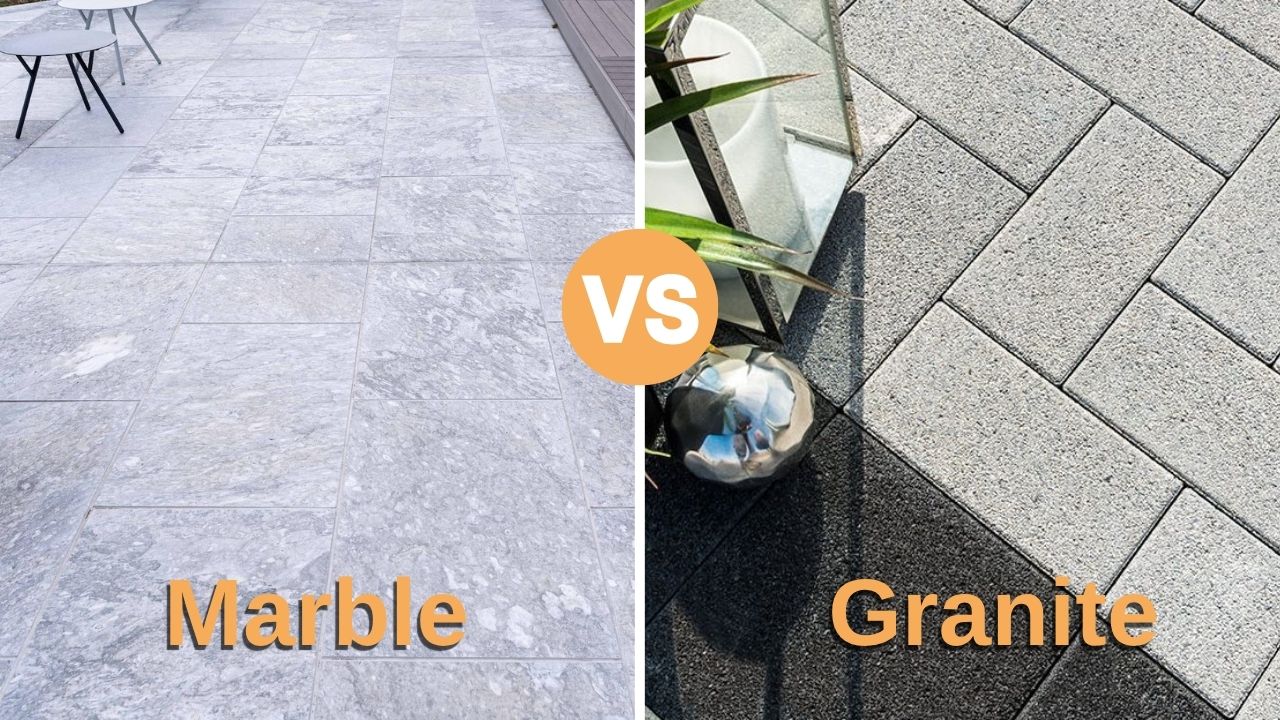
- For natural stone, material certification is more variable. It requires describing the type of stone, source region, compressive strength, and freeze-thaw test results. Granite, quartzite, and certain basalts are appropriate for vehicular-load permeable applications. Example of ASTM C666 freeze-thaw durability test results used to verify natural stone performance:

- Softer sedimentary stones, certain sandstones, and some limestones require careful structural verification before being specified under the vehicle bearing conditions.
Both material types work within the same base and drainage systems. They are governed by ICPI Tech Spec 18, ASCE 68-18, and EPA stormwater BMP guidance. Aggregate specifications ASTM No. 8 bedding, No. 57 base, and No. 2 subbase are applied regardless of the surface selected.
Step 3: Excavation and subgrade preparation
Step 3 of Permeable Pavers Installation is the proper excavation.
- Dig the full project area to a depth of 12 to 18 inches below the targeted finished surface. The base material area should extend a minimum of 6 to 8 inches beyond the perimeter of the paved surface to ensure edge stability.

- Remove all topsoil and any other organic material from the subgrade. If the soil is granular, compact it with a vibrating plate. Soil rich in clay subgrade may require a soil replacement with lime and crushed stone blend before compaction or any aggregate is placed.
The subgrade surface elevation should be verified and logged properly before base installation begins. Surface units cannot correct a poorly graded subgrade.
Step 4: Geotextile fabric
Step 4 of permeable pavers installation is installing the geotextile fabric. The fabric will be a separation barrier, lets water pass through, but prevents any fine particles from passing through. Without it, even a correctly specified aggregate system loses its drainage capacity as fines fill the voids over time.
- Directly lay the geotextile fabric on the compacted subgrade before any aggregate placement. Vertically apply the geotextile against the soil with a minimum 1-foot horizontal extension under the subbase on the soil subgrade.
- Where drainage is poor, and the solid is weak (CBR below 5%), increase the overlap to 2 feet.
- Your selected geotextile specification should follow AASHTO M-288 for the specific application class.

Step 5: Subbase and Base Layers
Step 5 of Permeable Pavers Installation includes placing stone in lifts. Then compacting each layer for better stability while maintaining void space.
- Install the subbase using ASTM No. 2 stone in minimum 6-inch lifts. Each lift should be compacted with a 10-ton vibratory steel roller, making two vibratory passes followed by two static passes.
- Completion will be achieved when no visible movement occurs under the roller. Field density should align with at least 95% of laboratory index density in accordance with ASTM D4254.
- Place a 4-inch layer of ASTM No.57 crushed stone as the paver base course once the subbase is completed. Install it in a single lift and compact using the same roller sequence.
This layer provides primary structural support while also functioning as the main drainage and water storage zone beneath the surface.

Some modern installations use a paver base panel instead of traditional crushed stone for faster installation and improved uniform support.
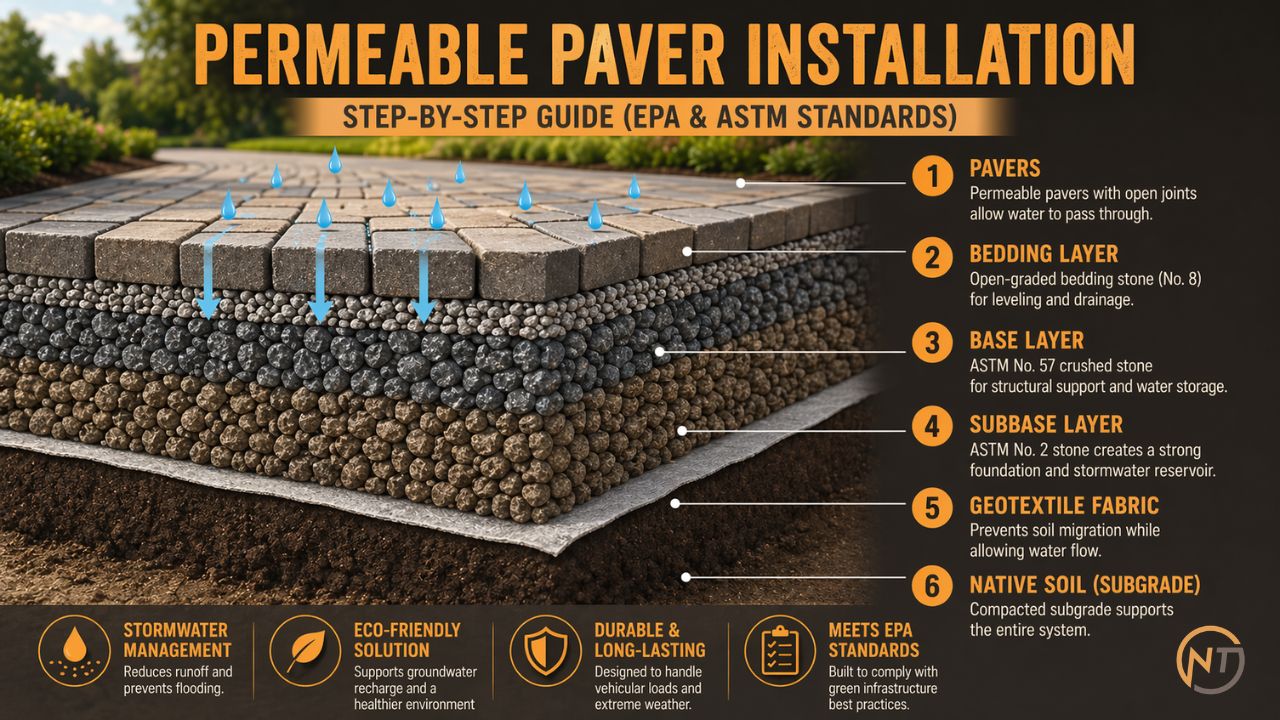
This Is How The Layer Stack Should Be:
The lay stack in permeable pavers installation is engineered, and each layer offers a distinct function:
- The surface layer for porcelain pavers 20mm, or natural stone 30-50mm, offers the finished traffic surface.
- The bedding layer would be open graded no. 8 stone (50mm) for a stable leveling course and offer fast infiltration.
- For the base layer, no.57 crushed stone (≈100mm) will distribute structural loads and support drainage performance.
- For subbase layer No. 2 stone (150-200mm +, depending on design) forms the primary structural foundation and stormwater reservoir.
- A geotextile separator to prevent migration of fines and maintain long-term layer stability.
- Compacted subgrade with Native soil, properly prepared to support the full pavement system.
Subbase thickness should follow structural and hydrologic design tables from the ICPI PICP manual and ASCE 68-18. The thickness of porcelain and natural stone pavers in vehicular application includes: 50mm bedding and 100mm base. It will remain at a consistent thickness while the subbase depth adjusts for site-specific conditions.
Step 6: Edge restraints
Step 6 is installing edge restraints along all perimeter edges.

- For porcelain permeable pavers installation, the edge restraint system requires a vertical height of 21/2 inches. It is sufficient to contain both the bedding layer and the lower portion of the 20mm unit.

- Follow the edge restraint manufacturer’s specific recommendations for permeable applications, including any geogrid usage requirements.
- Natural stone installation typically uses cast-in-place concrete curbs or precast units set in concrete haunches. The restraints should include at least the bottom half of each surface unit so the system stays aligned under the load shifting.

- For heavier stone units, especially the thick granite or bluestones, put more lateral pressure on edge restraints than porcelain. Opt for extra restraint capacity on natural stone vehicular applications rather than defaulting to the residential-grade minimum.
Edge restraint failure in both material types typically shows as lateral spread at the perimeter, joint gap widening, and loss of surface flatness.

Step 7: Bedding layer
Step 7 of Permeable Pavers Installation is adding a bedding layer.
- Start by moistening, spreading, and screeding ASTM No. 8 open graded stone to a consistent 2-inch depth throughout the base layer.
- Use two 2-inch steel pipe guides spaced 6 feet apart to set the screed depth, then draw a straight 2×4 board across them to create a flat and even surface.
- Fill voids left by removed pipes with additional No. 8 stone. The surface tolerance of the screeded bedding must stay within ±3/8 inch over a 10-foot straightedge.
- Once leveled, do not allow foot or vehicular traffic on the bedding layer before pavers go down. Even light loading compresses the open-grade stone and creates low spots that will then require full re-screeding to correct.
- When using natural stone with irregular thickness tolerances for bedding layers, it can absorb minor unit variations better than dense-graded sand.
This is another reason why sand should never replace an open-graded aggregate permeable bedding course. It loses permeability from the permeable pavers installation almost immediately under traffic.
Step 8: Laying the pavers
Step 8 of permeable pavers installation is laying pavers.
- Now starting from the lowest corner of the installation area. For porcelain paver installation, install a 4mm plastic spacer at every paver’s corner before placing the unit alongside.
- Two porcelain pavers shouldn’t touch directly, which is why the spacer maintains the drainage gap consistently. It also absorbs minor thermal movement through the surface. For every 100 square feet, approximately 34 spacers are needed.
- For natural stone pavers, set joint widths per the design specification, typically 10-15mm for drainage-oriented layouts. Maintain consistent joints using a gauge stick or layout strings throughout the field.
- If using porcelain plan formats (16×48, 12×48, 8×48), they should be laid in a one-third staggered pattern. Don’t install neighbouring planks at 50% offset. The resulting alignment stresses concentrate the load throughout the narrow contact point. It increases the breakage risk.
Check alignment every 6-10 feet against the first row. Lay the full-size units first, then cut perimeter pieces to fit. Always use a diamond blade wet-cut tile saw for porcelain paver cutting. Natural stone works well with both masonry saw and splitter cuts, depending on the stone type and edge specification.
Step 9: Joint filling and compaction rules
Step 9 is filling joints and compaction. This step is significant for both porcelain and natural stone, and it is the most common installation error when skipped.
- For porcelain permeable pavers installation, do not use a plate compactor directly on the surface. It can crack the surface due to impact. Spread ASTM No. 8 or No. 9 regular chip stone throughout the surface and sweep it into the joints with a still-bristle broom.
- You can either leave the joints open or filled, depending on the desired drainage. If plate compaction of the bedding and base underneath the pavers is required, the porcelain units shouldn’t be in place.
- For natural stone, plate compaction is fine, but it will require a urethane rubber mat between the plate and the stone surface. It will prevent scuffing and surface damage. This is especially important for stones with textures or an embossed surface.
- Run the two passes of compactors in all directions, and apply additional joint aggregate, clean sweep, then compact again.
Do not skip this step with either permeable pavers installation.
Step 10: Infiltration testing and project handover
Step 10 of Permeable Pavers Installation is testing the water infiltration and handing over the project.
- Once the joints are filled and the final surface cleaned up, run a water test throughout the entire finished surface. Make sure the water is drained through the joints without pooling on the surface.
- The Minnesota Stormwater Manual and EPA BMP guidance both reference a minimum infiltration rate of 100 inches per hour for permeable interlocking pavers. This test gives the baseline performance record that engineers and stormwater compliance officers use to assess long-term function.
- According to ICPI best practice recommendations, the installation contractor should return to the site six months after completion. He should fill the settling joints, replace any cracked or damaged units, and re-level any shifted pavers without additional cost.
For porcelain and natural stone, this return visit also provides the opportunity to inspect the 4mm spacer positions and confirm joint aggregate levels have not depleted from initial traffic loading.
Permeable Pavers Installation FAQs
Let’s answer your question about Permeable Pavers Installation.
Can porcelain pavers be used in a permeable pavement installation?
Yes. Porcelain pavers are a great choice for permeability because of open joints rather than through the surface unit itself.
Why can’t you use a plate compactor on porcelain pavers?
Using a plate compactor on porcelain pavers can result in a cracked surface because of the paver’s material density. Direct plate compaction transmits the impact energy through the unit rather than disturbing it.
What natural stone types work best for permeable paving?
Granite, quartzite, bluestone, and basalt are the most structurally reliable choices for vehicular permeable applications. Dense and low-absorption stones can withstand load cycling and freeze-thaw stress.
What spacer size is required for porcelain permeable pavers?
A minimum 4mm (5/32-inch) spacer is required at permeable paver corners.
How do you cut porcelain pavers on site?
Use only a diamond-blade wet-cut tile saw. Guillotine splitters crack porcelain. The cut edge is clean and dimensional, which is useful for tight perimeter fits well around curves and obstacles.
What infiltration rate is acceptable for a finished permeable paver surface?
The Minnesota Stormwater Manual and EPA guidance reference a minimum acceptance rate of 100 inches per hour for permeable interlocking pavers (PICP). Testing is performed using ASTM C1781/C1781M for unit paver systems.

Bottom Line
Permeable pavers installation has become a crucial part of modern landscape construction due to the positive environmental impact. Both porcelain and stone paver installation includes ASTM-graded aggregates, geotextile separation, edge restraints, and open-graded joints. However, the surface material changes the handling rules, but the structural logic remains the same.
Porcelain requires 4mm spacers, wet cutting, and no plate compaction. Natural stone requires more freeze-thaw resistant material, correct joint width, and rubber-pad protection during compaction. Both require a 2% slope and ASTM C1781/C1781M infiltration testing.
Failures happen below the surface, such as wrong joint material, skipped geotextile, and under-specified subbase. The stone above performs only as well as the base beneath it. Build the base right, and the surface lasts.
Sources & Technical References
- Belgard — Porcelain Pavers Installation Guide (Permeable & Sand Set)
belgard.com — Porcelain Installation Guide PDF - NT Pavers — Installation Methods for Porcelain 2CM Pavers
ntpavers.com — Installation Guidelines PDF - Landmark Ceramics / Mutual Materials — Porcelain Pavers Installation Guide (Frontier20)
mutualmaterials.com — Landmark Porcelain Guide PDF - StoneHardscapes, LLC — Porcelain Paver Installation (Permeable System, February 2026)
stonehardscapes.com/installation-of-porcelain-pavers - Archatrak — Porcelain Pavers Installation Considerations (November 2024)
archatrak.com/blog/porcelain-pavers-installation-considerations - CMHA / ICPI — PAV-GSP-016-21 Guide Specification: Permeable Interlocking Concrete Pavement (2021)
masonryandhardscapes.org — PAV-GSP-016-21 PDF - CMHA / ICPI — PAV-TEC-018: Construction of Permeable Interlocking Concrete Pavement Systems
masonryandhardscapes.org/resource/pav-tec-018 - Techo-Bloc — Permeable Pavers Installation Guide (EN)
techo-bloc.com — Installation Guide PDF - U.S. Environmental Protection Agency (EPA) — Stormwater Best Management Practice: Permeable Pavements (2021)
epa.gov — BMP Permeable Pavements PDF - Stormwater Magazine / ASCE — A National ASCE Standard for Permeable Interlocking Concrete Pavement: ASCE 68-18 (May 2020)
stormwater.com — ASCE 68-18 Overview - Minnesota Stormwater Manual — Minnesota PCA — Construction Specifications for Permeable Pavement
stormwater.pca.state.mn.us — Construction Specifications - Minnesota Stormwater Manual — Minnesota PCA — Design Criteria for Permeable Pavement
stormwater.pca.state.mn.us — Design Criteria - Virginia DEQ — Stormwater Design Specification No. 7: Permeable Pavement
Virginia Tech / VA DEQ — BMP Spec No. 7 PDF - Montgomery County DEP — RainScapes Permeable Pavement Technical Design Manual
montgomerycountymd.gov — Technical Design Manual PDF - Graniterock — Technical Note: Permeable Paver Systems (ICPI Aggregate Specifications)
graniterock.com/blogs/technical-note-permeable-paver-systems - Angelus Paving Stones — Permeable Paver Application: System Components & Design
angeluspavingstones.com/paver-application-types - TRUEGRID Pavers — Permeable Pavers Installation: Step-by-Step Guide (December 2025)
truegridpaver.com/permeable-paving-installation