Due to the delicate nature of marble stone, installing it requires precision and experience. However, some homeowners want to go DIY to install marble tile and make these mistakes. This results in an uneven, odd, and damaged surface that is not just uneasy to walk on, but it also doesn’t withstand regular usage and wear.

12 Marble Tile Installation Mistakes
Whether you are a seasonal DIYer or working with the professionals, these are the mistakes common to marble flooring, wall tiling, and other related projects. Check these 12 mistakes while installing marble tiles.
- Skipping Proper Surface Preparation
- Using the Wrong Adhesive
- Skipping Back Tile Adhesive
- Failing to Plan the Tile Layout
- Inconsistent Grout Lines
- Ignoring Waterproofing
- Rushing Curing Time
- Not Sealing Marble and Grout
- Tile Lippage or Uneven Surfaces
- Improper Marble Cutting
- No Space For Joint Movement or Expansion
- Crack-Isolation Membranes
1- Skipping Proper Surface Preparation
Skipping the surface preparation is the most common marble tile installation mistake. Homeowners, and usually the first-time DIYers, assume that the surface is ready to be worked on. What they don’t understand is that marble tile requires a perfectly flat and clean surface. An uneven base floor will not only be unstable but will also have dust under it. This will result in cracking, shifting, or loose tiles.
This is why preparing the surface before installing marble tile is crucial. The surface should be leveled, cleaned thoroughly, and made solid.
2- Using the Wrong Adhesive
Not using the accurate adhesive is another common marble installation mistake. Marble is an absorbing natural stone type. When using adhesives that contain pigments or chemicals that marble can absorb. This happens with lighter stones like white marble. It results in stains under or over the surface.
Opt for a white and natural stone-compatible adhesive instead of a dark or generic one. Avoid using mastic (a pre-mixed adhesive), which may stay soft or damage the stone over time.
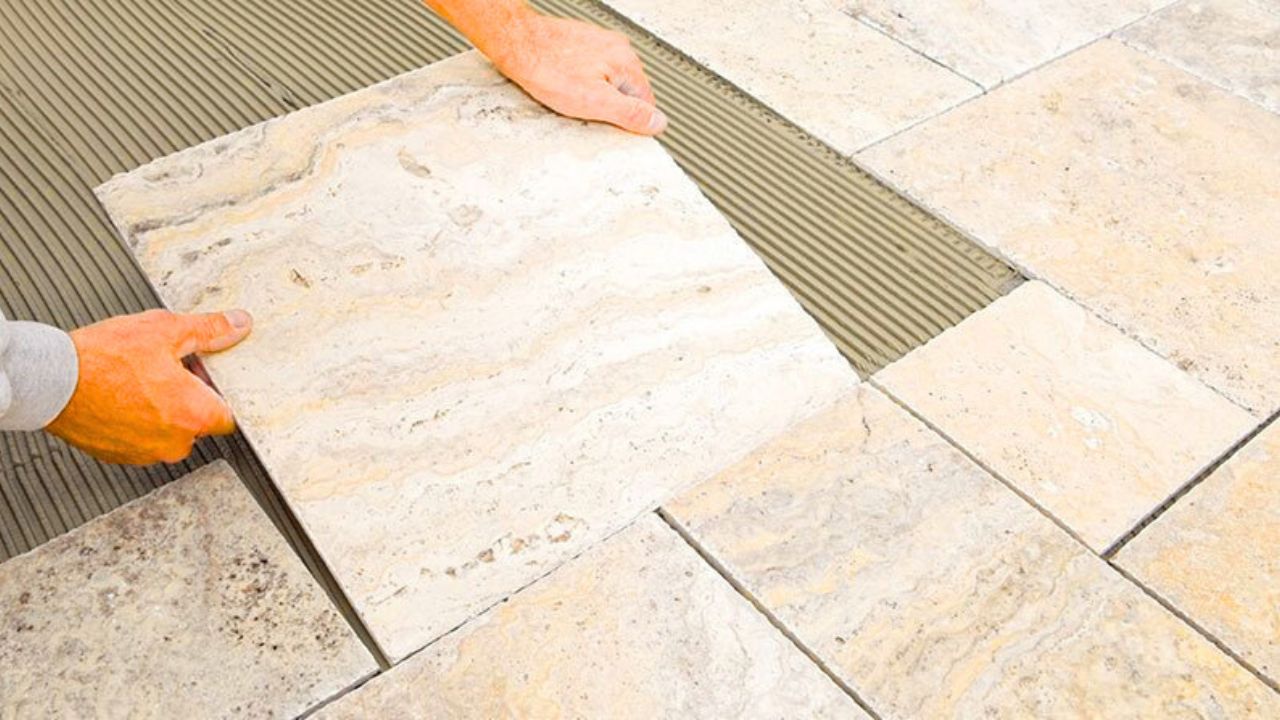
3- Skipping Back Tile Adhesive
When working with large marble tiles then keep in mind that they have slight curves or dips in them. If you didn’t apply the layer of thinset directly to the back of the tile (which is also called back buttering), it will not stick properly.
It will also leave empty pockets underneath. These voids can later cause cracks or make tiles sound hollow when tapped.

4- Failing to Plan the Tile Layout
Whether it is a DIY marble tile installation or a professional installation, a proper tile layout is crucial. Not planning out the accurate tile layout will result in awkward cuts at edges and poor alignment of the natural veining patterns.
Since marble often has flowing lines in its design, a well-thought-out layout will create a more beautiful and balanced look. Planning also helps avoid waste and odd surprises in the end.
5- Inconsistent Grout Lines
Another common mistake while installing marble tiles is the inconsistent grout lines or not using the spacers. A consistent space between marble tiles will make the tiles look neat and professional. If you skip spacers or overlook the gaps, then the result would be uneven grout lines or rows. Even tiny differences are noticeable with marble.
Tile spacers make sure each tile is placed evenly, which gives a smooth and polished finish at the end of the tiling project.

6- Ignoring Waterproofing
Not considering waterproofing while installing marble tile in areas like bathrooms, showers, and the kitchen is a common mistake. A proper waterproofing is required to install the tile in wet areas.
Marble can absorb moisture, and if water gets behind the tile, it can lead to mold, stains, or damage to the wall or floor. Waterproofing layers, such as membranes or sealants, are crucial to install to protect the stone and your home.
7- Rushing Curing Time
Rushing the curing time is a common tile installation mistake by DIYers with no experience. They will rush into grouting or sealing soon after setting the tiles. It is important to let the adhesive set and cure, which may take up to 24 to 48 hours. Rushing into sealing or grouting will result in moisture trapping and tile shifting.
This will weaken the bond or cause discoloration. It is recommended to give it the accurate time and wait patiently for a more durable and professional installation.
8- Not Sealing Marble and Grout
Marble is a porous natural stone tile, which means it can absorb liquids, oil, and dirt. Not opting for the sealing marble will result in staining easily. The same applies to grout.
This is why it is recommended to apply a high-quality sealer to protect both surfaces from moisture, stains, and everyday wear. This step is simple, but skipping it can cause long-term damage.
9- Tile Lippage or Uneven Surfaces
Lippage is another common marble tile installation mistake that looks ugly and has a tipping hazard. It happens when one tile is higher than the next to it. If you are using the polished marble surface, then lippage would be highly visible.
Using a leveling system and regularly checking your work with a straightedge can prevent this issue.
10- Improper Marble Cutting
Marble requires special tools for cutting, such as a wet saw with a diamond blade. Cutting marble with the wrong tools, like dry cutters or general-purpose blades, can chip the edges or even crack the tile.
This is precision that matters when cutting marble tile on your own. It gets even crucial when working with expensive or delicate slabs.

11- No Space For Joint Movement or Expansion
Like all natural materials, marble expands and contracts in response to temperature changes. Leaving the expansion or movement joints, which are the small gaps at the edges, is crucial. The tiles will press against walls or fixtures and eventually crack or pop loose.
These joints are later filled with flexible caulk instead of grout to allow for slight movements.
12- Crack-Isolation Membranes
Floors can shift or crack slightly over time. If marble tiles are installed directly on these surfaces, they can crack too. That’s why using a crack-isolation membrane is important. It works like a cushion between the floor and the tile.
This way, small movements on the floor won’t damage the marble. It’s especially useful for concrete or wood subfloors.
What Are the Risks of DIY Marble Installation Without Experience?
Marble tile installation requires even more precision than ceramic or porcelain tile. This is because of the soft and porous surface of marble tiles. Each tile should be perfectly level with the others to prevent lippage. Most homeowners and DIYers don’t understand these technical details, and they risk damaging the marble tile because it cuts differently from ceramic. The wrong blade can crack or chip. Without proper tools or techniques, DIY installs often lead to expensive re-dos.
When Should You Call Professionals to Install Marble Tiles?
When installing marble tiles in wet areas like bathrooms, showers, uneven subfloors, or when the installation involves tricky layouts and large-format tiles, consider calling a professional tile installation service.
Also, consider expert help if you’re unsure about sealing, using the right adhesive, or making clean cuts. Marble installation isn’t just about placing tiles; it’s about avoiding costly mistakes that can ruin the look or durability. A professional ensures it’s done right from the start.
Common Tile Installation Mistakes FAQs
Here are the most common questions regarding marble tile installation answered to prevent these mistakes.
What type of thin-set should I use for marble tiles?
Use a white, unmodified, non-staining thin-set that is compatible with the natural stone.
Do I need to seal marble tiles before grouting?
Yes. Always seal marble tiles before and after grouting to prevent staining and water absorption.
Can I use regular grout for marble tile joints?
No. Use unsanded grout for joints smaller than 1/8 inch. Sanded grout can scratch the polished marble surface during application.
What’s the ideal substrate for marble tile installation?
A flat, level, and stable surface, such as cement backer board or self-leveled concrete. Do not use wood subfloors unless reinforced properly because marble will crack over flexing surfaces.
How do I protect marble tiles after installation?
Once marble is sealed, opt for stone-safe cleaners, avoid using harsh chemicals on the surface, do not drag furniture on the marble surface, and clean it regularly.
Should I install marble tiles myself or hire a professional?
If you have no prior experience with natural stone installation, hire a professional. Marble requires special handling, sealing, and leveling techniques that differ from regular tiles.
Conclusion
Marble tiles installation is not an easy DIY tile installation process. The delegate nature of marble tile requires skills and precision to create a stunning marble surface to walk on. However, as a DIYer, you should avoid the mistakes such as skipping proper surface preparation, Using the wrong adhesive (e.g., dark thinset or mastic), lack of proper adhesive the large marble tiles, Failing to plan the tile layout, Not using spacers or inconsistent grout lines, Ignoring waterproofing in wet areas, Not sealing marble and grout, tile lippage or uneven surfaces and so on.
Ignoring expansion gaps or attempting a DIY installation without the right skills may lead to long-term problems. Avoiding these pitfalls helps ensure a smooth, durable finish that brings out the best in your marble. Proper maintenance after installation also plays an important role; using the right methods, including understanding how to clean bathroom tiles safely, helps preserve the surface and keeps the marble looking its best over time.


